
loading...
I love the French culture. I love its food, its people, its language, and well, did I mention the food? I was originally a French major at Columbia College, and when that didn’t work out…well, I always told myself I’d be able to study French culture with my English degree. Miraculously, I have. Although my French comprehension varies from day to day–reading versus listening versus speaking–my ten years of on again, off again study has taught me one thing: although I may have trouble conjugating verbs on the spot, or pronouncing words correctly, I know how to cook French food.
This recipe for a traditional Julia Child’s Pâté de Canard en Croûte is an epic feat for anyone interested in French cooking. You have to be certain you want to make this dish, you have to plan, plan, plan on making it in a timely fashion, and you have to, above all else, pronounce the name correctly.
Allow me to explain myself. I fake French. Yes, I just admitted to that. Although I love the language and do have a significant amount of comprehension, I don’t necessarily speak the language like the natives. Frequently, I mispronounce words, add emphases to the wrong syllables, and well, just make a plain old crazy pronunciation fool of myself. Thus, it should be no surprise that in the two weeks in which I thought about and truly conceptualized this recipe, I made an absurd pronunciation mistake:
“So, Helana, what did you say you were making again?” one of mes amis française recently asked.
“OH! Well, Pâté de Canard en Croûte, but of course” I replied cheerily. Here’s what I thought I said: “Oh! Well, duck paté roasted and cooked in a pastry shell, delicious, yes?” But here’s how I pronounced the phrase:
“Pâté de CONARD en Croûte” not “Pâté de CANARD en Croûte.” Don’t get the simple pronunciation mistake?
Well, for those of you familiar with the French language, a “canard” is a duck. A “conard” as many people have told me in the last few weeks is an “asshole” or a dense person. Thus, when I pronounced the word with more of an “ugh”-schwa-like phoneme, my friends assumed I didn’t mean duck, but butt. Sigh. The French. It’s always something.
What I love best about this story is how no one thought to correct me until two weeks had passed and I suddenly started spelling “canard” with an “o.” Then, they corrected me, in storm. Whilst this makes for a funny story, I must warn anyone preparing this recipe NOT to pronounce “canard” incorrectly. In the words of my friend Jessica, you say “CANard” like “CAT.” Okay? Okay?
Onto the actual recipe itself: this dish covers seven pages of Mastering the Art of French Cooking and should be done in stages. Many food bloggers boast of their ability to accomplish each stage of the recipe in one sitting, but I think that such speed quickly wears away at one’s gumption at attempting such an absurdly unique paté and pastry dish. So here’s the schedule I would suggest to any wanna-be-French-chef: de-bone the duck the night before you wish to sew it up and make the paté (i.e., Tuesday night); on Wednesday, prepare the paté, stuff the bird, and sew it up; on the third day, Thursday, or whatever day you are serving the dish, brown your bird, roll out your crust, and prepare the actual snazzy final product. With enough time spent on each step, you’re certain to get the dish right the first time and have an impressive presentation.
This recipe–although some say overrated and too much work–is actually rather sensational. There’s something about getting such a complicated dish done correctly, serving it to friends, and just well, not making an ass of yourself (or the duck) in the process.
Pâté de Canard en Croûte
This version of the famous duck and pastry recipe comes from Mastering the Art of French Cooking (pages 571-576). Although Julia suggests serving it “cold,” Jessica and a couple of my other French friends have advised that the dish be served hot. Since this is the temperature at which I served my duck, I highly suggest eating it warm. Leftovers can be eaten cold.
Ingredients:
* 1 5-lb read-to-cook roaster duckling
* 1/2 tsp salt
* 1/8 tsp pepper
* pinch of allspice
* 2 Tablespoons Cognac
* 2 Tablespoons Port
* 2-3 diced canned truffles and their juice (optional)
* 4 cups pork and veal stuffing
Special Equipment Needed:
* A trussing needle and cooking string
Day 1: De-Bone the Duck
In America, de-boned duck is probably the most un-American culinary idea anyone has ever come up with. Ever. Thus, I think it is truly important to learn how to de-bone a duck oneself instead of relying on Whole Foods employees to do it. Basically, this task needs to be done correctly and when you ask a professional, they won’t know what you mean. Behold, my experience trying to cut this step below (instructions for deboning a duck follow):
I went to Whole Foods last night to pick up the duck and have him/her/it de-boned. I asked the butcher there (who, is usually pretty nice and knows exactly what I want), “Hey, can I get a 5 lb roasting duck, de-boned?”
He looked at me…somewhat scared, smiled, then frowned, then yelled at his comrade, “Hey, Billy. Can you come over here? I need your help.”
Billy approaches. Billy asks what I want. I repeat my order. He says something along the lines of, “Do we do that here?”
I said, “YES! Of course!”
Then he asked me, “How do you de-bone a duck?” as if it was the strangest thing he’d ever heard of.
Okay…you’re the butcher…you should know how a duck is de-boned, or a chicken, or any poultry item for that matter. So I tell him, “You make an incision in the back and….” He looked at me with glazed eyes.
I went to the cheese section with a friend. Talked with my cheese guy…then talked with one of the bakers. Had a great time smelling stinky cheeses and soon returned to the meat counter.
I found Billy, my other meat guy, and he looks at me and says, “That’s all I got out of it” pointing to a mass of incomprehensible duck meat, inards, and a wing, half-flapping on top of the pile. I wanted to cry. That duck had been killed once. What did he DO TO IT?!
“You said to remove the bones, right?” The butcher looks at me with pleading eyes.
“Um…yes…but I need the duck skin to retain its shape. You know, like the duck’s bones just melted off or something” I say, hoping he’ll finally get it.
After a few seconds pass, the guy just shakes his head and says, “I don’t know how you would possibly do that. And if there is a way to do it, I’m not qualified.” He looked SO disappointed with himself. The fact that someone could stump the butcher at Whole Foods is…well…an accomplishment.
I felt SO bad for the guy, but really I felt bad for the useless duck whose meat was lying in a puddle on the counter ravaged by sharp knives and a rather confused butcher. I guess this isn’t France.
Point of the story: when an under-qualified Whole Foods Butcher could not de-bone my duck, I, like the insane person that I am, acquired a second 5 lb duck and went home and de-boned it myself with the help of 4 sharpened knives, an on-looking friend, and lots and lots of wine. Would you believe that the more I drank, the easier deboning that damn duck became? It was amazing. Like wine and my brain chemistry resorted back to some primitive instinct about how to destroy a bird whose size is significantly smaller than me.
Now that I’ve done it, I think de-boning a duck is actually quite easy. You just need to know what you’re doing.
How to “De-Bone a Duck”: A Crash Course Courtesy of Julia Childs
According to Julia, deboning a duck is the kind of task that completely frightens the novice cook and that if he/she doesn’t know what they are doing, it can take them 45 minutes. Well, in my case, it easily took an hour and a half as I was so determined to do this step correctly. In general, here’s what you need to do.
1.) Flip duck onto its stomach, back facing up.
2.) Make an incision down the center of the duck’s back from the neck to the tailbone. This step exposes the backbone.
3.) With a small, sharp knife, scrape and cut always towards the bone and never towards the skin. Basically, lift the exposed skin away from the bird’s body and very carefully and methodically, scrape at the bone of the bird while you pull the flesh from the carcass. A slight pulling technique and scraping technique will inevitably help to separate skin from bird meat and bones. In about 10 minutes, you’ll start to see the skin hanging off the bird’s body.
4.) Continue this step all the way around the bird’s carcass. I went ahead and pulled the skin from the bird’s carcass first and left the wings and legs for the last step.
5.) When you get to the legs, you need to sever the ball joints. Sever them and very carefully remove the skin from this area (Julia says to be especially careful at this point as the skin is thinnest and most sensitive at this point to slitting open). Repeat this step on both legs.
6.) When you have removed the skin from the legs and the majority of the carcass frame, lift up the carcass frame up and allow the skin to hang down onto your cutting board. From here, you must gage where the skin remains to be removed. Using the same technique you used around the carcass frame, cut against the bone NOT the skin and pull the skin slightly during this step. Eventually, you will have separated your entire bird’s skin from the carcass. It should look something like this:

7.) Now that you are a deboning expert, take your knife and make a similar incision against the breast meat and any remaining meat that is still sticking to the duck’s skin. You want only the skin to remain, so using a sharp small knife, cut against the meet (NOT the skin) and remove the breasts of meat. You will have two medium-sized duck breasts.

8.) Your final product should be all skin in the shape of a duck:

9.) Wrap and refrigerate duck until day two when you make the paté and sew up the duck.
Day Two: Make Paté, Stuff, & Sew Up Duck
This day is certainly easier than the first. Here, you merely need to prepare the paté and create the bird-wrapped loaf.
1.) Cube duck breasts from the day before.

2.) In a bowl, add cubed duck breasts and any leftover duck meat from day 1. Add 4 cups (2 cups each) of ground pork and veal.
3.) Add spices–salt, pepper, allspice–and cognac and port. Mix to fully integrate. If using canned truffles (I did not as they are waaaay to expensive, but used two tablespoons of truffle-infused olive oil from Vom Fass instead), cube and add to mixture. Stir one last time to integrate ingredients properly.

4.) Now, roll out the de-boned duck skin from the day before on a clean work surface. Using your hands, add the paté to the center of the duck’s skin (back-skin should be facing out and you should be working with the inside of the duck). Shape paté into an evenly flat log.

5.) Take excess duck skin and fold over and on top of the paté loaf.

6.) Thread your trussing needle with cooking thread and evenly sew up all seams of the loaf. This may take a while and you want to make sure that no seam goes un-sewn.

7.) Using the same cooking thread, wrap a secure binding around the entire duck several times (this binding will help to keep the duck’s shape when you cook the skin/outside tomorrow).

8.) Cover and refrigerate until day three.
Day Three: Cook Duck, Cover in Pastry, & Roast
Finally, the day on which you cook the duck has arrived!
1.)Add 3 tablespoons of cooking oil to a large skillet. Heat to medium-high until oil is almost smoking.
2.) Add duck to pan and brown the duck slowly on all sides. Don’t be too skimpy with this step: the skin must be entirely cooked before you remove it from the oven, otherwise, the skin will taste gross in the final product. Basically, the browner the duck skin, the better. Remove duck from pan and allow to cool. When the duck has cooled, do not remove any of the trussing strings (they help to keep the duck in place/hold its shape during the baking process).

3.) Roll out pastry on a clean, floured surface (see here for a perfect butter-crust pastry that is very similar to Julia’s).
4.) Place pastry in a lightly-greased roasting pan and place cooled duck loaf on top of pastry. Then, place a second layer of freshly rolled out pastry on top of the duck. Bringing both layers of pastry together, pinch the edges all around the roast until the bird is completely sealed in a well-fit pastry shell.
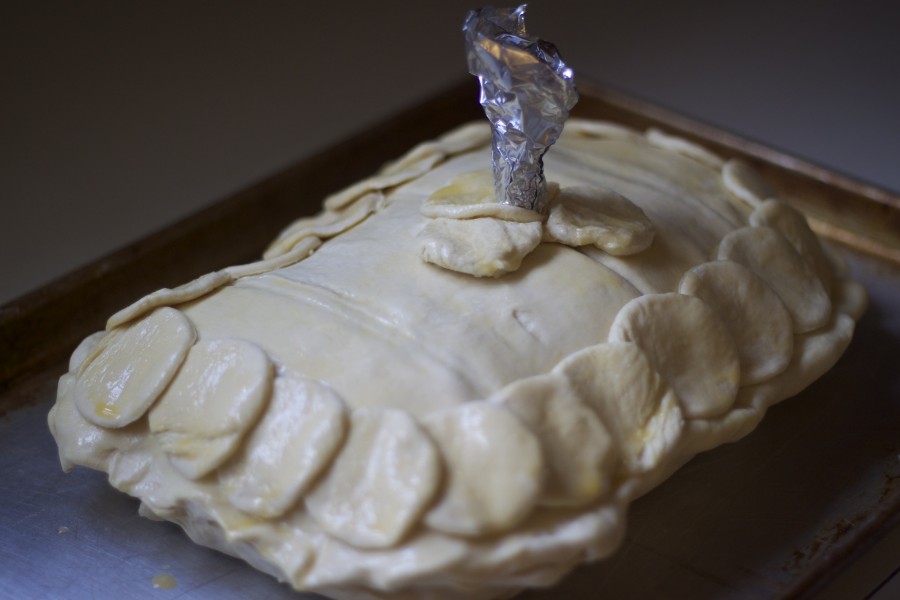
5.) Using a circular cookie cutter, cut-out around 25-30 circular rounds. Feel free to carve “fan-shaped lines” into the pastry circles, or leave them blank. Decorate the edges of the top pastry level (right about the pastry seam) all the way around the pastry shell. Place remaining 3, or 4 rounds in the center.
6.) Beat one egg and using a brush, paint the entire pastry shell. Once shell is painted, pre-heat oven to 350F. Using a small, sharp knife, make an incision into the center of the pastry (about a 1/8 inch hole) and add a small foil flute to it. This flute will allow excess steam to escape the shell during the baking process.

7.) Place duck in oven and cook for 2 hours, or until a meat thermometer reads at 180F from the center-flute.
8.) Place cooked duck on a work surface and allow duck to settle for about 15 minutes.

9.) Once duck has sat for 15 minutes, use a sharp knife and make an incision all the way around the pastry shell underneath the decorative circles. The idea is to cut under the “cap” of the pastry by making an incision into where the pastry shell seam comes together.
10.) Now, ask two friends for assistance–if it wasn’t for Jessica and Natacha, I don’t know how I would have gotten the pastry top off without breaking my hard work into a million pieces. I suggest using two spatulas–one pair for each end of the pastry shell–and lift the shell quickly off the duck and lay flat on a plate.

11.) Breathe. The duck will have shrunk significantly during the cooking process, but that’s okay. Now, using your fingers, carefully remove the cooking thread from the entire duck. Make sure to remove all of the thread (the last thing you want is to eat cooking thread with your duck paté!). Once threads are removed, place shell back on top of the duck.

12.) Place cap back onto the duck. Using a sharp knife and significant gumption, carve the duck and crust as one dish. Julia says to “make a deep incision the length of the breast, and cut lengthwise slices angled towards the center of the duck on each side” (576). Basically, cut the duck up and down the way you would beef wellington so that you serve both meat and pastry at the same time. Enjoy! Makes 20 servings.

6 Comments
Clearly Delicious » Mastering the Art of French Cooking by Julia Child
January 6, 2011 at 7:11 am[…] I know about French cooking. I discovered linguistic blunders and poultry techniques with her Pâté de Canard en Croûte and discovered my favorite Provincial French Vegetable dish with her Ratatouille. In each […]
Carolyn Wright
March 9, 2012 at 11:55 pmHaving become very curious about the final recipe shown in “Julie & Julia”, I was fortunate to find your webpage that thoroughly satisfied my curiousity while making me laugh out loud while reading your unfortunate “Whole Foods” experience. It would’ve been right at home in a Chicken Soup for the Soul for French Cooking type book. I truly appreciated all the specific and candid directions and reasons therefore and know it would be wonderful to learn from your experiences. Such a pleasure to read. Thank you so much!
Helana
March 11, 2012 at 11:58 amCarolyn-
Thank you so much for this kind comment! This recipe has become one of my absolute favorites, but it’s an adventure to make, eat, and experience. Needless to say, my “Whole Foods guy” has never quite looked at me the same wondering if I’m going to throw him a curve-ball every time I order a steak. Do let me know if you make this! It’s completely worth it…every bite. Just make sure to drink *lots* of wine.
Carolyn Wright
March 19, 2012 at 12:15 amI don’t understand, why lots of wine? Light years away from being a connoisseur or great cook, but love learning about it. I’ll be back for more! Thanks.
Helana
March 19, 2012 at 9:30 pmMy comment is mostly tongue-and-cheek Carolyn. I was so nervous about the act of deboning a duck (and you might find yourself feeling similarly if you choose to make this recipe!) that the “lots of wine” is merely to calm the nerves. I found myself feeling more and more confident after each glass :).
Clearly Delicious » Roasted Heirloom Tomatoes on Multi-grain Baguette
June 12, 2012 at 7:01 am[…] Rouge boggles my mind. Paris has been a life-long goal of mine (romanticized a little too much here and here) and with the ongoing presence of these artisan loaves at my Saturday market, I feel as if […]