
loading...
With as much time as I spend in my kitchen, one might imagine beautifully organized shelves where bags of flour have been alphabetized, extracts sit from largest to smallest, and spices magically appear at the front of the cabinet right when I need them.
(Pauses for laughter)
Why?
Up until last week, my pantry was a mess.
[Note: this is *not* my pantry, but you get the idea….]
When I moved into my new place in the Garden District, I had plans for grandiose reorganizations with the transferring of my stuff from my old space to my new. I’d color-coordinate my closets, keep only useful books within reach, and have tons of counter space and tons of floor space.
Alas, not so much. Although I can say I’ve done about 2 of the 4 things listed above, I still have nowhere to put my books and up until last week, no idea where anything was in my pantry. And this dilemma struck me as surprisingly weird–I actually got a larger pantry in my new home, but had even less control over it.
After reading a rather inspiring post at Cupcakes and Cashmere, I put the reorganization of my pantry at the top of my list and bit the somewhat expensive bullet that is buying new canisters, dividers, shelves, and hooks. And? It was entirely worth it. Here’s my second post in Clearly Delicious’s “How To” Series.
Here are my mantras for reorganizing your–or any–food-based pantry into a space that is functional and as aesthetically pleasing as one can get:
1.) First, you’ll just need to pull everything out. Create a clean space from which to rebuild order out of disorder.
2.) Wipe down everything and ensure that shelving is clean.
3.) Line shelves with shelving liners for a non-stick barrier between the wood, metal, or plastic of your shelves and the containers that will be sitting on them.
4.) Organize everything into its own category so that when you do place food items, pans, or what have you back in the pantry, you’ll be more readily able to keep things organized:
-if you’re a baker, then each flour, grain, seed, nut, sugar, and like item should be clumped together (we’ll return to this in a moment)
-lump together cans and jars
-separate baking goods that are delicate and small (extracts, sprinkles, flavorings, and food colorings); you may also wish to add any cupcake liners, baking powders, and other small goods to go with this category
-keep all pans together that are flat and often used for baking
-keep pots in their own cabinet (away from flat pans)
5.) Invest in your clean space–this means spending just a little bit of money on tools that will make your cabinet functional and lovely.
-I bought small utility containers to act as grab baskets for my extracts, sprinkles, and food colorings
-these canisters for flours, sugars, and commonly used bakery goods such as grits and corn meal as well as candies such as sweetened desiccated coconut, chocolate chips, and marshmallows
-an over-the-door rack for keeping spices in their own space (away from the canned goods, flours, and more). I’ve found my largest cause of clutter arises when spices go missing becoming jumbled up amongst the clutter of sauces, cans, and flours. This way, they’re separate and you always know where they are. Plus, the rack creates new organizational space that you didn’t have before.
-various sizes of jars (here and here) to create vacuum seals for dry items like nuts and seeds
–label maker to mark different cans and canisters with food names
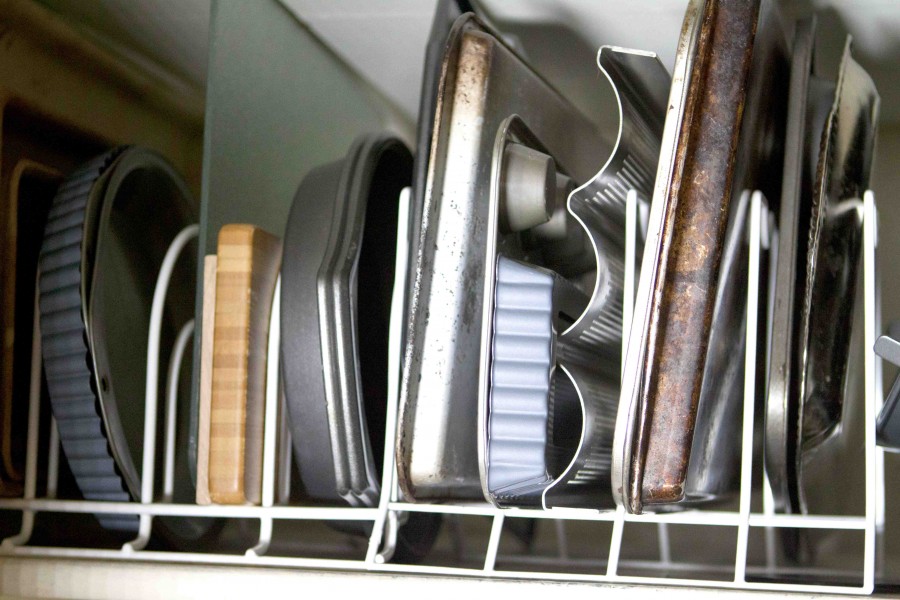
–the best rack of all time: great for dividing baking sheets, tart, cake, and pie pans, cutting boards, baguette pans, cupcake and muffin tins, and any other item that usually ends up laying flat and cluttered amongst itself. I bought two and can now find any pan I need at a moment’s notice!
–tiered-shelving that allows you to keep cans and ingredients of the same size in stackable order (so you can see something of the same height all the way in the back easily).
6.) With these gadgets, a clear head, and some thoughtful thinking, I now have the best set-up for my 4-shelf pantry:
Shelf 1 (Bottom) stores cans, jars, and sauces in stackable tiered shelving
Shelf 2 (2nd from Bottom) stores all canisters, bakery items, pastas, grains, and the like in a left-to-right format that’s grabble and easy to work with
Shelf 3 (2nd from the Top) stores all of my pans, cutting boards, and baking items in a straight up-and-down format that’s grabble and clean
Shelf 4 (Top) stores kitchen gadgets that many people put on their kitchen counters, but I like to keep up when not being used. This shelf includes my Foreman Grill, juicer, food processor, rice cooker, waffle maker, and fondue pot. Items that are used most sit in the front (such as my Foreman and food processor) and items that are used least sit in the back (such as my fondue pot).
Look at the lovely results:
 Pictured: grab-friendly bins of extracts, chocolates, sweeteners, and food colorings.
 Pictured: small-size canisters for items you use in smaller quantities like semisweet chocolate chips and bitter cocoa.
 Pictured: tiered-shelving that actually works! Items of the same height are now stackable so that you can see exactly what’s in the back just as well as what’s in the front.
 Pictured: over-sized canisters and punched labels make differentiating between several kinds of flour much easier.
In the future, I plan to buy these under-shelf baskets (or maybe these) to store my pot holders, napkins, and various towels. And this under-shelf basket to keep my various wraps in order.
My enthusiasm for reorganizing my pantry is so great, I can’t stop showing it to people when they walk into my kitchen. But, a fair warning: if you get over-excited about having a canister and individual jar for everything, your project might get a little bit pricey, but the one-time purchases for air-tight containers safe from bugs and temperature change are totally worth it–especially, if you live in southern Louisiana like me. Plus, nothing says peace of mind like a clean, organized kitchen pantry. For that, I’d pay $10 a canister any day.
—
Follow me on Pinterest: http://pinterest.com/helana/
Twitter: https://twitter.com/DancesWLobsters
Facebook: https://www.facebook.com/pages/Clearly-Delicious/103136413059101
Tumblr: http://clearlydelicious.tumblr.com/
Instagram: http://instagram.com/helanabrigman
How To: Reorganize A Pantry,
3 Comments
Clearly Delicious » Kitchen Spice Cabinets
April 8, 2013 at 7:38 pm[…] starting the spring 2013 internship program at Clearly Delicious, my writing and editorial interns (here and here) have repeatedly remarked on the detailed, alphabetized spice rack that hangs from my […]
Betsy
September 18, 2013 at 6:54 pmWhere can I buy the exact same “oversized canisters” that you have pictured here? I need some!
Thanks, Betsy
Helana Brigman
September 22, 2013 at 6:03 pmHey Betsy –
These oversized canisters are from Walmart and super easy to find: just locate their kitchen supplies section and look for organizational materials like trays, jars, and canister sets. These exact ones (I believe) are the Mainstays line and only available in stores. But, you can find similar ones online at Walmart…however, I suggest checking them out in person (it’s way more fun that way).
OXO has a version that you can find online (and are basically identical) at Amazon, here: http://www.amazon.com/OXO-Grips-5-Piece-Container-White/dp/B002903KEW/ref=sr_1_4?ie=UTF8&qid=1379887375&sr=8-4&keywords=oxo+canister